

( note – This article contains a number of links that will take you away from the NER website. Please read the whole article and THEN click on the links to proceed down the rabbit hole to the Internet! )
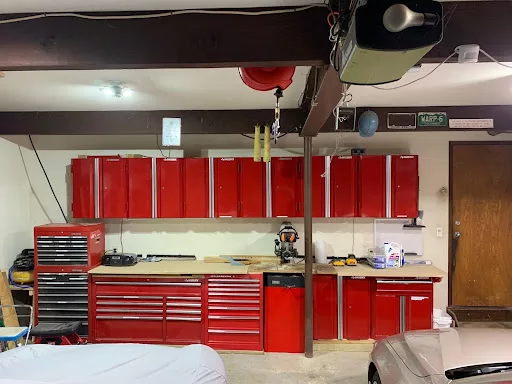
For the past 30 years, my Garage has been a Hodge-podge of home-built workbenches, recycled filing cabinets, and mismatched overstuffed toolboxes. All piled together along the back wall of my two-car garage. Every project would start with a search for the proper tools, or at least for something that would more or less accomplish what was needed. I had a workbench, but most of the time, it was buried under a pile of pieces and parts leftover from old projects or the beginning of the next one.
Just so we are clear – here’s a picture.

So when the Covid Lockdown caused everything to come to a screeching halt, it was the perfect opportunity to completely redo the Garage.
Research and Design Considerations
I had a rough idea of what I wanted to do and how the result should look, but since this was a project that I only wanted to do once and it was probably going to be somewhat spendy, I needed to do some basic research first to understand what is available. Over the past few years, I’ve been collecting information and catalogs from all the various manufactures. I’ve been inside a number of well-equipped shops and dealerships. We’ve even been treated to the full tour of the Team Pensky Porsche Spyder Race Car Transporter. So I have a good idea of what’s possible and what constitutes the “State of the Art.” I’m sure you’ve also seen the ads for Baldhead Cabinets systems in Pano. And if you’ve been paying attention to YouTube, I’m sure you’ve seen the various garage makeover videos. The range goes from Gladiator cabinets in polyvinyl available at Wallmart and the steel ones at Home Depot and Lowes all the way up to Lista Aluminum cabinets that you find in the race car transporters for Teams like Penske ( who, in honor of Mark Donahue, have their cabinets made of unobtainium ).
If you are not familiar with Lista, here’s a link to LISTA Modular Cabinets – ListaCabinets.com
Or you can explore the options at the very Porsche Centric – Baldhead Welcome – Baldhead Cabinets
Here’s another Option – Moduline PROII™ Custom Garage & Shop Cabinets Aluminum Storage (modulinecabinets.com)
Or, if you have an even bigger budget and a tendency toward OCD, you might want to consider the options promoted by the Youtube Channel Obsessed Garage. — Sonic Cabinets, which come complete with sets of tools all laid out in foam drawer inserts. Individual (sonictoolsusa.com) But now we are detouring off into tool chests, and not really Garage Cabinet systems.
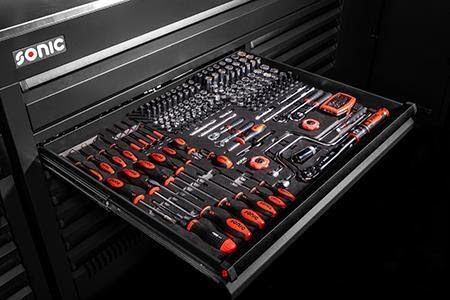
Foam Inserts are a really nice way to organize your tools, and you will always know what’s missing. But they are also available separately, so you do not need to do all the drawers in foam or go the Full Sonic replacement route.
Or you can do your own foam system. Here’s a video on the Kaizen Foam. Or this system by Shadow foam.
So … since I’m not operating at Penske Budget levels, and it’s not me that gets cars delivered on my street by the Porsche Motorsports truck, as shown below. ( and it’s not neighbor NER Track Chair, Adam Swartz either )

Let’s get more realistic. I wound up focusing on three systems. My target budget was more like under $ 3,000 and not the $ 40,000 that some YouTube installations are promoting.
The first step of my investigation started with New Age Products. Garage Storage Cabinets | Pro Series | NewAge Products (US) You may know their ads from Costco and others. They sell pre-configured groups of cabinets in various colors and combinations. They come in 2 basic levels of steel gages, and you get what you pay for. Buy the cheaper versions at your peril. They also have a free design service that will help you find the combination of cabinets that works best for you. Here’s a video of “Tavarish” Unboxing and installing a set from New Age in his early Florida home Garage. Making My Garage Awesome Pt 1 – YouTube. It was this video that first got me thinking about a Garage Makeover. – How hard could it be???
Next is Harbor Freight’s US General line. Harbor freight is well known for their cheaper imported questionable quality tools. Their cabinets and tool chests, however, are medium quality and certainly suitable for Home use.
And finally, Home Depot’s line of Husky cabinets, Lowes also carries a line of Cabinets as well and sells the Craftsman line, now that Sears is gone.
Pay attention to all the details when deciding what line to pursue. Consider the “gauge” of the metal used for the cabinets; the commercial-grade cabinets use a heavier gauge, the most expensive use Aluminum, for cabinets intended for Trailers and Transporters. But for home use, I’m not sure it’s worth the extra cost. Double-check the drawer slides. Are they really full extension? Does the back of the drawer fully clear the face of the cabinet? Do the deeper drawers have two slides per side? How much weight can they support? A drawer densely packed full of sockets is actually remarkably heavy. Also, I completely ignored the cabinets made from Melinte and plastic. How are you going to handle all those boxes of small hardware? Nuts and bolts/drywall screws, 50 different sizes of whatever. Two trays of your collection of different size Porsche small hardware were collected over the years. And a place to store all those Porsche Special Purpose Tools that you only use for doing that one job on the Porsche model that you no longer own.
The next consideration is the mix of types of cabinets; how many cabinets with shelves and how many cabinets with drawers, and do you want any full height tall wardrobe type cabinets. You’ll need a mix of all types. For my solution. I went with all double door wall cabinets for the upper cabinets across the back wall. I had room for two wardrobe-type cabinets on the Garage sidewalls. As for the base cabinets, for my needs, I discovered you can’t have too many drawers. More is better — with plenty of shallow depth drawers. Different widths help as well. Do the drawers have a latching mechanism or are they soft closing? The object is to complexly fill each drawer with one layer of one type of tool. One draw for metric sockets, one drawer for SEA combo wrenches, One drawer for plyers, one for drivers, A deep drawer for all your Battery-powered DeWalt toys — you get the idea. No more sorting through a pile of open-end wrenches for the correct size. I counted the drawers, and I wound up with 41.
Next, consider the drawer slides. Make sure the drawers open all the way out; some cheaper cabinets do not. Also, the more robust cabinets have multiple slides for the lower, deeper drawers. Also, check the horizontal depth of the drawers. Some of the cheaper brands don’t have the cabinet depth that others do. If your countertop is 26 inches, you don’t want 14-inch drawers beneath. A full-size drawer should roughly be the same size as your countertop.
And lastly, what color? Black? — No, my Garage is dark enough – as it is. Gray? Nope. Blue? Nope Red!!!
Layout
Start with a clean slate. A blank wall. Decide how much countertop you need? Then fill in cabinets from there. The object should be to fill the available space. Your particular combination will be different.
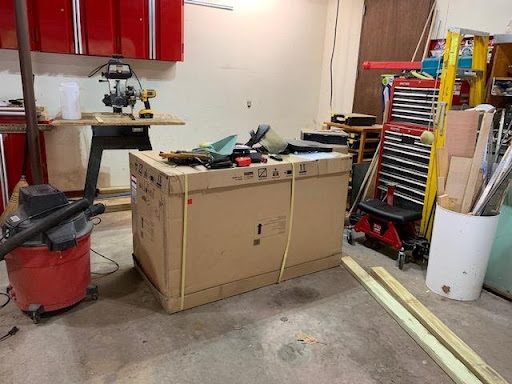
Don’t forget to look for design problems and special considerations. In my case, there were three. I have a support column that needs to be considered in the center of the Garage that is 30 inches from the back wall. I also need to accommodate a place for my air compressor and also my radial arm Saw. My design needed to make sure the column would not interfere with opening Cabinet doors or drawers. I also put the air compressor at one end all the way in the corner, and I discovered I could eliminate the large feet that formed the base of the saw and build a new base that matched the cabinets along with custom bending some sheet metal, painted to match the Cabinets. It turns out Rustoleum Cherry Red is a remarkably close Red.
So ….what did I order ??
I wound up focusing on the Huskey line as I felt it gave me the best bang for my Dollars. I wanted to Maximize my countertop space, so my design was pretty straight forward 1 Long continuous countertop with Wall Cabinets across the top and a combination of lower cabinets. And I happened to be able to put two wardrobe style recycled used office cabinets on both sidewalls. I ordered 5 of the wall Cabinets to start.
Unboxing and assembly
Having watched enough YouTube on garage cabinets, I knew that the wall Cabinets would arrive packaged as a collection of flat panels that would need to be assembled. Husky 29” X29” Wall Cabinet Assembly – YouTube
The first one took an hour to assemble, and by the time I did the last one, I had it down to 15 minutes. The wall cabinets hang on a bar that goes across the back of the cabinets. Make sure you have located and marked all the wall Studs so that the bar is secure and level. Once the mounting bar is in place, placing the cabinets is a matter of making sure all the corners align and the doors are straight before securing them to each other.
The lower cabinets are an entirely different matter. Since all of my lower cabinets have drawers, they all came preassembled (or at least mostly assembled); this means they are big and heavy. And in order to make the total width measurements of the cabinets work out to the same as the width of the wall space, I wound up with Husky Cabinets combined with my old Sears Craftsman Rolling tool chest and one tool chest from Harbor freight. Since I had chosen Red as my cabinet color, I verified that the three different manufacturers all used a very similar red color. (at least for me, it all looks the same — but then I’m red-green color deficient) . Be aware that if you order from different providers, their colors might not be exactly the same.
Dimensions
There are a few key dimensions that you need to set early on in the design. Start with the workbench surface elevation. Just how high off the floor do you want the surface of your workbench? You have some options. This choice may even influence the choice of a cabinet manufacturer. There is no standard. And if you mix brands, you will need to have a means of adjusting the heights. Do you want wheels on your base cabinets? Some people want the ability to move their tool chests, but I intend to have a single contiguous workbench, and I don’t want the empty space under the cabinets that collect all sorts of dirt and small parts that need to be cleaned. My intention is to remove the wheels, and the cabinets will live on a Pressure Treated wood frame that will form the “Toe Kick.”
Once the countertop height is established, we can determine the bottom of the Wall Cabinets. You need to have room to clear whatever might live on the workbench and yet still easily reach the bottom and middle shelves of the Wall cabinets. All of these dimensions are a matter of personal preference, and there doesn’t appear to be a universal standard. Getting them wrong, however, will be a source of annoyance for a long time.
Then there is the question of drawer sizes; you need an adequate mix of drawers of various widths, including at least one drawer that is extra wide. I have one drawer that is 48 inches wide to store some tools that are extra long. Some are 30 inches wide, and some are 16 inches wide. Some drawers are 2 inches deep, so only a single layer of items fits in them.
Some are 3 or 4 inches deep, and a few at the bottom are 10 and 12 inches deep for the larger battery-powered tools.
The more drawers, the better … and with so many drawers, it really helps to Label the drawers and cabinets. Maybe if I were 25 again, I could remember where everything is. Now – not so much.
Lighting;
Garage lighting is notoriously bad. Typically a garage has one or two 60 watt bulbs in the center of the ceiling supplemented by the 40-watt bulb in the garage door opener. In the past, people would add a few fluorescent “shop lights,” and it would be somewhat better. Based on how often they seemed to need replacement, I expect that they were adversely impacted by the frequent extreme temperature fluctuations found in a home garage environment. But now, you can replace those 60-watt bulbs with LED Fixtures that will flood your Garage with light. It makes a tremendous difference both in the number of lumens available and the power consumed, plus LEDs are now available in higher color temperatures that more closely resemble daylight than incandescent bulbs
Bench Top:
Again there are the default choices; most base cabinets come with some sort of surface to be used as a Bench surface. You can go with a vinyl mat, some sort of faux wood laminate surface, or stainless steel. But I wanted one continuous surface that spanned over all the lower cabinets. With a mix of different base cabinets, some with raised edges, some with laminate, I needed to build my own. So with all the base cabinets in place, my first impulse was some pieces of maple all glued together, but that seemed like a lot of effort and expense for a top that was just going to get dented, scraped, and stained over time. The final choice was ¾ inch Pressed Particle Board Cut to size so it could occasionally be replaced when the surface became too marred or stained over time.
Power:
I added some power strips to the space between the upper wall cabinets and the benchtop. Plus, I need to add a reel-mounted electric power cord drop that matches my air hose reel.
Backsplash:
Some people like to use pegboards as backsplashes behind their workbench. Then they hang all sorts of frequently used tools on the pegboard, but following my design of as clean as possible, I have just a plain painted wall.
Hardware storage:
If you are like me, I have a large collection of miscellaneous hardware built up over the years of homeownership. Or maybe it was the old Yankee farmer in me being taught not to throw anything away that was potentially useful. It was collected in jars and boxes and those strange boxes full of little drawers that sat on top of your workbench taking up space, odd sizes of screws, nails, more recently, partial boxes of the ubiquitous drywall screws that get used for everything because you have a battery-powered Screw gun / Drill. You are going to need a place for all that hardware.
Stanley makes a plastic storage tray with nice dividers. They come in various sizes and have removable and reconfigurable bins within them. Plus, they come with a nice handle, so you can take the whole bin to wherever you are working, and you don’t have to go back and retrieve more pieces. I have a bunch of them and divide all my hardware into groups; that way, I can store all the trays in a manner so that I can access each tray without removing any of the others.
Here is my solution.


Pneumatics:
Some of you probably spotted the air hose reel hanging from the ceiling in the first photo. That’s something that has been in my Garage for a long time, ever since I bought a pneumatic Nailer when I installed wood floors in the house. Everyone should have a compressor. It comes in handy for all sorts of tasks. The reel is centered in the Garage and reaches to all corners, and it is even long enough to reach outside to top off the tires on my lawn tractor. All that remains is to find a home for the compressor and run the “plumbing” for the air hoses.
Flooring:
There are a number of different choices here. Some people like the Plastic /Vynal / Rubber grid Flooring systems like Swiss Trax Swisstrax Ribtrax Smooth Pro | Interlocking Garage Flooring, While others prefer the sealed Epoxy coatings like Garage Floor Epoxy | ArmorGarage. I can’t see how the grid-like Trax systems do anything but collect dirt and moisture, which seems to require frequent cleaning. The newer epoxy paints for concrete floors do seem to wear better than old Concrete Paints, I helped a friend repaint his shop floor on a yearly basis, so I’m a little Leary of a painted floor, but then his shop had a lot more traffic over the floor than most home garages, and the epoxy technology has come a long way since then. I’ll most likely go that route when I eventually get around to deciding if a treated floor system is what I really want to do. For the time being, it’s not a priority, and the garage floor will remain as it is – plain concrete.
Lifts:
What’s the ultimate toy, err .. tool for your garage? Well, a lift, of course. The problem is I don’t have the ceiling height in my garage to handle a two-post or a four-post lift. Ok, I guess technically I could probably squeeze one in, but I certainly don’t have enough height to double-stack cars in the garage, which would be the main advantage and use. There are alternatives that provide some of the functionality of a lift; Quickjack makes some portable lifts for a reasonable price point that will lift your car 24” off the ground and leave space to work on suspension and the engine. My need is not great in that area. Maybe down the road.
The Final Result ( for Now….. )

|
One final Thing….. What did all this cost??… |
|
|
6 Husky Wall Cabinets @ $149.00 ……….. |
$ 894.00 |
|
2 Husky Base Cabinets @ $229.00 ………. |
$ 458.00 |
|
1 Husky 52 inch Tool Chest ……… |
$ 598.00 |
|
1 US General 8 Drawer Tool Chest …….. |
$ 499.00 |
|
Countertop, Lighting, and Misc. ……….. |
$ 250.00 |
|
|
_______ |
Total ……… $ 2,699.00
Show us what your Garage solution looks like!
Written By: Ted Shaw